Social networking hubs like Facebook, Twitter, Google +, Linkedin and many more has emerged as the most successful approach to promote a content or service. Every internet user wants to follow his beloved Brands, Authors and idols. Social networking websites helps the end users to connect with their favorite web pages and share the likings with their circle.
Whether it is a service providing website or an informational blog page; Social media icons are a part of every web design. Social Media icons are used to share the content on the social networking hubs and are also looked as a feedback collecting form for the author.
How to create social media icons for your website? Designing the Custom Social Media icons can be a complicated hassle for the beginners. To help everyone out there; with this post of mine I am explaining the simple steps to design Custom Social Media Icons in CSS3.
In this post we will design the social media icons and the sharing counters for Facebook, Twitter and Google+ profile. By following the basic algorithm behind the designing process; you can even extend the process further for more social networking platforms like Youtube, Linkedin, Pinterest etc.
Step 1: Designing the Basic Button Layout
To design the social media buttons; we will start with designing the basic button shapes. Development of HTML5 is an easy and affordable process and hence everyone can make an attractive online presence with the trade. The HTML code for simple button shapes is provided below:
<html>
<head>
</head>
<a href=”#”>Tweet</a>
</div>
<a href=”#”>Like</a>
</div>
<a href=”#”>+1</a>
</div>
</html>
After defining the basic button shape; we will concentrate on shaping it as per the requirement in the proceeding steps. In the upcoming step we will use CSS to tweak the appearance of these icons.
body {
font: 0.875em/1.5 ‘Helvetica Neue’, Helvetica, Arial, sans-serif;
padding: 42px 40px;
}
a {
text-decoration: none;
}
.share {
display: inline-block;
margin-right: 20px;
}
.share__count {
background-color: #fff;
border: solid 1px #a5b1bd;
border-radius: 3px;
/* add in vendor rules */
box-shadow: 0 1px 3px rgba(0, 0, 0, 0.15);
/* add in vendor rules */
color: #424a4d;
float: left;
font-weight: bold;
margin-right: 10px;
padding: 4px 10px;
position: relative;
text-align: center;
}

Till this step we had successfully designed the basic layout for the social media buttons and share counter. To finalize the desired basic look; we have to add the below provided CSS Code to the program.
.share_size_large > .share__count {
display: block;
float: none;
font-size: 18px;
margin-right: 0;
margin-bottom: 12px;
padding: 10px 0;
}
.share__btn {
border: solid 1px rgba(0, 0, 0, 0.2);
border-radius: 3px;
/* add in vendor rules */
box-shadow: inset 0 1px 3px rgba(255, 255, 255, 0.3), 0 1px 3px rgba(0, 0, 0, 0.15);
/* add in vendor rules */
color: #fff;
display: inline-block;
font-size: 13px;
font-weight: bold;
padding: 5px 10px;
text-align: center;
text-shadow: 0 1px 1px rgba(0, 0, 0, 0.4);
}
Step 2: Styling the Buttons with CSS Elements
Step 2 concerns about the styling of the basic layout. In this step we will integrate the HTML code to the CSS element. I had provided the HTML code below which must be combined with the different share buttons you had designed. You can add the codes to the buttons as per their tag name; for example add “type_Twitter” for twitter style, “type_facebook” for the Facebook style and so on.
.share_size_large > .share__btn {
padding: 5px 0;
width: 100%;
}
.share_type_twitter > .share__btn {
background-color: #4099FF;
}
.share_type_facebook > .share__btn {
background-color: #3B5999;
}
.share_type_gplus > .share__btn {
background-color: #F90101;
}

Step 3: Designing the Share Counter
At this step we will integrate the Share counter to the social media buttons. You can add the below provided HTML code to the buttons which are employed to display the social media counters.
.share__count:before, .share__count:after {
content: ”;
display: block;
height: 0;
top: 50%;
position: absolute;
right: -14px;
width: 0;
margin-top: -6px;
}
.share_size_large > .share__count:before, .share_size_large > .share__count:after {
content: ”;
display: block;
height: 0;
left: 50%;
position: absolute;
top: auto;
width: 0;
}
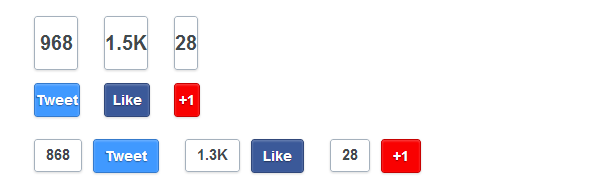
Step 4: Finalizing the Design Interface
Up till this step you can see the actual interface of the social media buttons and we just need a few tweaks before finalizing the design. In this step we will add some basic styles and will fix Borders or Layout issue if any. Add the below provided code to the design to make it look more clean and fluid.
| .share__count:before {border: solid 7px transparent;border-color: transparent transparent transparent #a5b1bd;}.share_size_large > .share__count:before {
border-color: #a5b1bd transparent transparent transparent; bottom: -14px; margin-left: -7px; }
.share__count:after { border: solid 6px transparent; border-color: transparent transparent transparent #fff; right: -12px; margin-top: -5px; }
.share_size_large > .share__count:after { margin-left: -6px; bottom: -12px; border-color: #fff transparent transparent transparent; } |
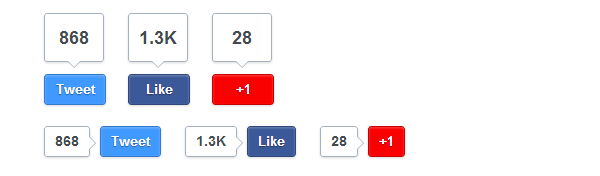
Step 5: Linking the Counter with Social Website API
Congratulations! You had successfully designed the front End interface of the buttons till this step and now it’s time to make them functional. For this we have to use PHP.
Copy the below provided code and integrate this with your design. You have to replace the URL written (‘http://api.twitter.com/YOURPOST/PAGE’) after file_get_contents with the URL of your social media page/profile.
‘; $fbend = ”;
$fbpage = $facebook;
$fbparts = explode($fbbegin,$fbpage);
$fbpage = $fbparts[1];
$fbparts = explode($fbend,$fbpage);
$fbcount = $fbparts[0];
if($fbcount == ”) { $fbcount = ‘0’; }
}
function twit_count() {
global $tcount;
$twit = file_get_contents(‘http://api.twitter.com/YOURPOST/PAGE’);
$begin = ”; $end = ”;
$page = $twit;
$parts = explode($begin,$page);
$page = $parts[1];
$parts = explode($end,$page);
$tcount = $parts[0];
if($tcount == ”) { $tcount = ‘0’; }
}
?>
After saving the file with the name Social.php; you can now attach the social media buttons to the actual share counters. You have to paste this PHP code at the fake counter numbers which are located near your social media buttons.
Conclusion
I hope you had successfully added the social media icons on your website. Finding any error? Please feel free to share that with us in the comment section below. You can even share the snapshots of the icons if you had done some more creative tweaks in the CSS styling.


